해당 프로젝트는 코드로 배우는 스프링 웹 프로젝트(개정판)을 기반으로 진행됩니다.
17.4 JavaScript 준비
JSP 내에서 댓글에 대한 처리는 하나의 페이지 내에서 모든 작업이 이뤄지기 때문에 조금 복잡하다. 또한 기존과 달리 JavaScript와 동적으로 만들어지는 HTML로 처리하기 때문에 각 단계를 작성할 때 주의해야한다.
17.4.1 JavaScript의 모듈화
JavaScript에서 가장 많이 사용되는 패턴 중 하나는 모듈패턴이다. 모듈패턴이란 쉽게 말해 관련있는 함수들을 하나의 모듈처러 묶음으로 구성하는 것을 의미한다.
예제 프로젝트의 webapp 내 resources/js 폴더에 reply.js 파일을 작성해본다.
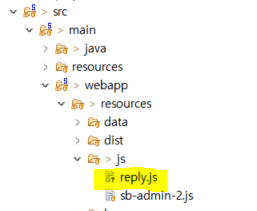
reply.js
: 우선은 아무 기능 없이 생성해 놓는다!
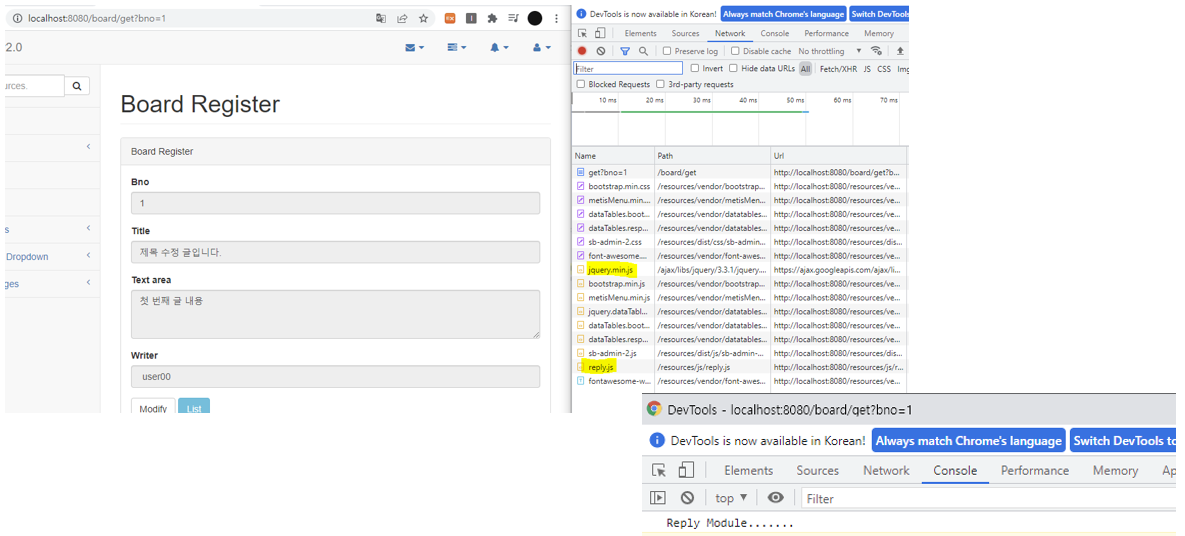
console.log("Reply Module.......");reply.js 파일은 게시물의 조회 페이지에서 사용하기 위해 작성된 것으로 views/board/get.jsp 파일에 추가하도록 한다.
views/board/get.jsp
...생략...

<script type="text/javascript" src="/resources/js/reply.js"> </script>

<script type="text/javascript">
	$(document).ready(function(){

		var operForm=  $("#operForm");

		$("button[data-oper='modify']").on("click", function(e) {
			operForm.attr("action", "/board/modify");
			operForm.submit();
		});


        ...생략...
테스트 수행
reply.js가 정상적으로 동작하는지 확인을 위해 특정 게시물을 조회해본다. 개발자 도구를 통해 reply.js가 같이 호출된 것을 확인할 수 있다.
모듈 구성하기
모듈 패턴은 쉽게 말해 Java의 클래스처럼 JavaScrips를 이용해서 메서드를 가지는 객체를 구성한다. 모듈 패턴은 JavaScript의 즉시 실행함수롸 '{}'를 이용해서 객체를 구성한다.
reply.js
console.log("Reply Module.......");
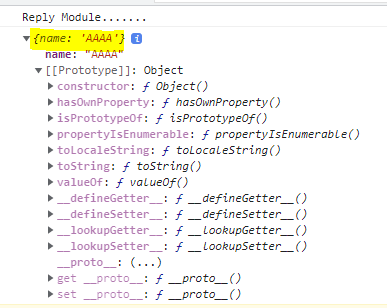
var replyService = (function(){
return {name:"AAAA"};
})();JavaScript의 즉시 실행함수는 () 안에 함수를 선언하고 바깥쪽에서 실행한다. 즉시 실행함수는 함수의 실행 결과가 바깥쪽에 선언된 변수에 할당된다. 위의 코드에서는 replyService라는 변수에 name이라는 속성에 'AAAA'라는 속성값을 가진 객체가 할당된다.
views/board/get.jsp 일부
<script type="text/javascript" src="/resources/js/reply.js"> </script>

<script type="text/javascript">
	$(document).ready(function(){

		console.log(replyService);

...생략...
테스트 수행 결과
17.4.2 reply.js 등록 처리
모듈패턴은 즉시 실행하는 함수 내부에서 필요한 메서드를 구성해서 객체를 구성하는 방식이다.
reply.js
console.log("Reply Module.......");
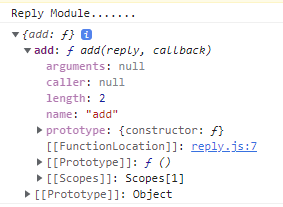
var replyService = (function(){
function add(reply, callback) {
console.log("Reply.......");
}
return {add:add};
})();개발자 도구에서는 replyService 객체의 내부에는 add라는 메소드가 존재하는 형태로 보이게 된다.
외부에서는 reaplyServece.add(객체, 콜백)를 전달하는 형태로 호출할 수 있는데, Ajax 호출은 감춰져 있기 때문에 코드를 좀 더 깔끔하게 작성 가능하다.
reply.js 내에 add 함수를 Ajax를 이용해서 POST 방식으로 호출해보자.
reply.js
console.log("Reply Module.......");

var replyService = (function(){

	/*
	function add(reply, callback) {
		console.log("Reply.......");
	}
	return {add:add};
	*/

	function add(reply, callback, error) {
		console.log("add Reply.......");

		$.ajax({
			type : 'post',
			url : '/replies/new',
			data : JSON.stringify(reply),
			contentType : "application/json; charset=utf-8",
			success : function(result, status, xhr) {
				if(callback){
					callback(result);
				}
			},
			error : function(xhr, status, er) {
				if(error){
					error(er);
				}
			}
		})
	}

	return {
		add:add
	};

})();
board/get.jsp 일부
<script type="text/javascript" src="/resources/js/reply.js"> </script>

<script type="text/javascript">
	$(document).ready(function(){

		console.log("===============================");
		console.log("============JS TEST============");

		var bnoValue = '<c:out value="${board.bno}"/>';

		//for replyServuce add test
		replyService.add(
			{reply : "JS TEST", replyer :"tester", bno:bnoValue},
			function(result){
				alert("RESELT : " + result);
			}
		);

...생략...
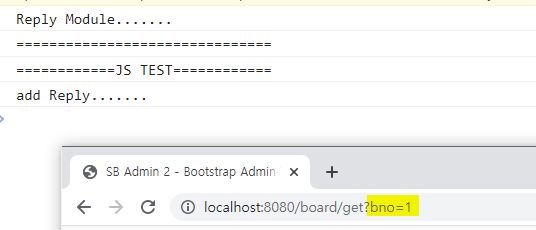
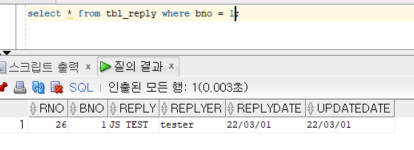
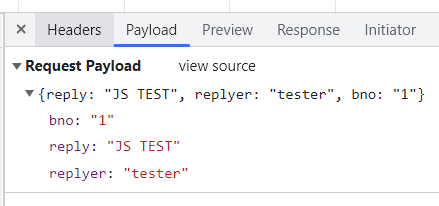
테스트 수행
<게시글 1번 조회 시에 댓글 추가 확인>
<게시글 조회 시에 댓글 추가 확인 - Database>
<게시글 1번 조회시에 댓글 추가 확인 - 개발자 도구>
<게시글 1번 조회 시에 댓글 추가 확인 로그>

17.4.3 댓글의 목록 처리
특정 게시글의 댓글 전체 리스트를 가져온다. 페이징 처리도 되어야하지만 뒤에 진행하고 우선 전체 리스트를 가져오는 것 부터 진행해보겠다.
'/replies/pages/게시물번호/페이지번호.json or 페이지번호.xml' 형태로 데이터 먼저 확인하기
http://localhost:8080/replies/pages/378/1.json

http://localhost:8080/replies/pages/378/1.xml
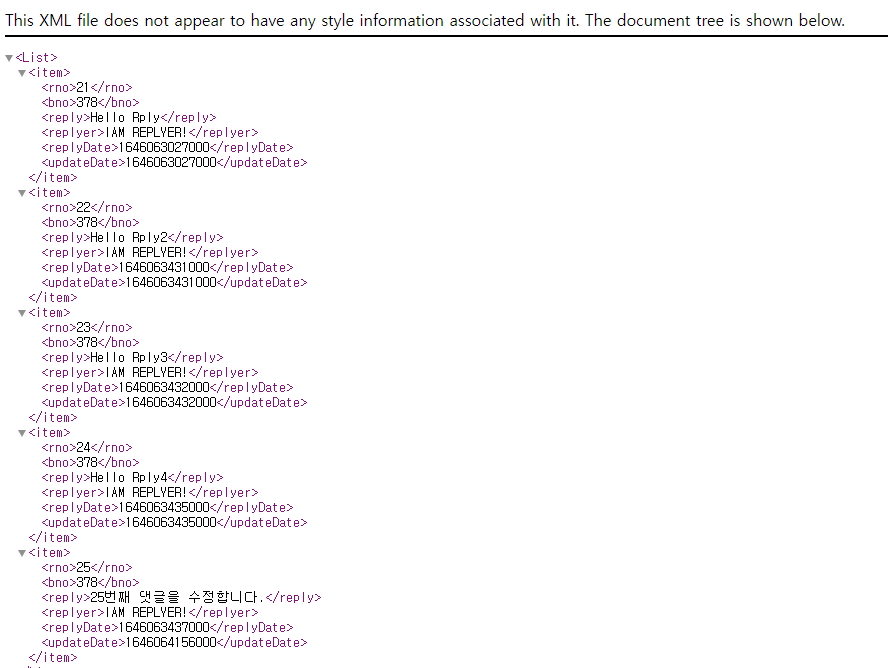
getJSON() 사용
reply.js에서는 Ajax 호출을 담당하므로 jQuery의 getJSON()을 이용해서 처리할 수 있다.
reply.js 일부
	function getList(param, callback, error) {
		var bno = param.bno;
		var page = param.page || 1;

		$.getJSON("/replies/pages/" + bno + "/" + page + ".json",
			function(data) {
				if(callback) {
					//callback(data); //댓글 목록만 가져오는 경우
					callback(data.replyCnt, data.list); //댓글 개수와 목록을 가져오는 경우
				}
			}).fail(function(xhr, status, err) {
				if(error) {
					error();
				}
			});
	}

	return {
		add:add,
		getList : getList
	};
getList()는 param이라는 객체를 통해서 필요한 파라미터를 전달받아 JSON 목록을 호출한다. JSON 형태가 필요하므로 URL 호출 시 확장자를 '.json'으로 요구한다.
get.jsp
		//해당 게시물의 모든 댓글을 가져오는지 확인
		replyService.getList(
				{bno:bnoValue, page:1},
				function(list){
					for(var i=0, len = list.length||0; i<len; i++){
						console.log(list[i]);
					}
				}
		);
테스트 수행 결과 확인
http://localhost:8080/board/get?bno=1202122

17.4.4 댓글 갱신과 삭제
댓글 삭제는 DELETE 방식을 통해서 호출한다.
reply.js 일부
	function remove(rno, callback, error) {
		$.ajax({
			type : 'delete',
			url : '/replies/' + rno,
			success : function (deleteResult, status, xhr) {
				if(callback) {
					callback(deleteResult);
				}
			},
			error : function(xhr, status, er) {
				if(error){
					error(er);
				}
			}
		});
	}


    ..생략

    return {
		add:add,
		getList : getList,
		remove : remove
	};

})();
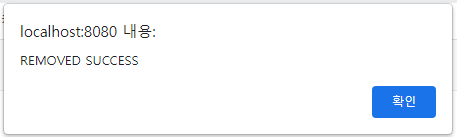
get.jsp 일부 - 23번 댓글 삭제 테스트
		//댓글 삭제 테스트
		replyService.remove(23,
				function(count){
					console.log(count);
					if(count == "success"){
						alert("REMOVED SUCCESS");
					}
				}, function(err) {
					alert("ERROR,,,");
				}
		);
테스트 수행
<기존 댓글 목록에 23번 댓글 있는 것 확인>

<댓글 23번 삭제 확인>

17.4.5 댓글 수정
댓글 수정은 수정하는 내용과 함께 댓글의 번호를 같이 전송한다. (댓글 등록과 매우 유사하다.)
reply.js 일부
..생략..

	function modify(reply, callback, error) {
		console.log("RNO : " + reply.rno);

		$.ajax({
			type : 'put',
			url : '/replies/' + reply.rno,
			data : JSON.stringify(reply),
			contentType : "application/json; charset=utf-8",
			success : function (result, status, xhr) {
				if(callback) {
					callback(result);
				}
			},
			error : function(xhr, status, er) {
				if(error){
					error(er);
				}
			}
		});
	}

    	return {
		add:add,
		getList : getList,
		remove : remove,
		modify : modify
	};

})();
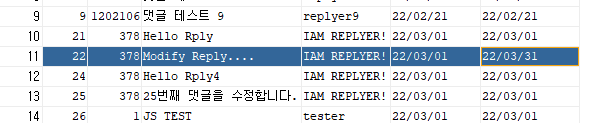
get.jsp - 22번 댓글 수정
		//댓글 수정 테스트
		replyService.modify(
			{rno : 22, bno:bnoValue, reply : "Modify Reply...."},
			function(result){
				alert("댓글 수정 완료");
			}
		);
테스트 수행
<22번의 댓글이 변경됨을 확인>
17.4.6 댓글 조회
특정 번호의 댓글 조회는 GET 방식으로 동작한다.
reply.js 일부
..생략..

	function get(rno, callback, error) {

		$.getJSON("/replies/" + rno + ".json",
			function(result) {
				if(callback){
					callback(result);
				}
			}).fail(function(xhr, status, err) {
				if(error){
					error();
				}
			});
	}


	return {
		add:add,
		getList : getList,
		remove : remove,
		modify : modify,
		get : get
	};

})();
get.jsp - 22번 댓글 조회
		//댓글 조회 테스트
		replyService.get(22,
			function(data){
				console.log(data + "조회 성공");
			}
		);
테스트 수행

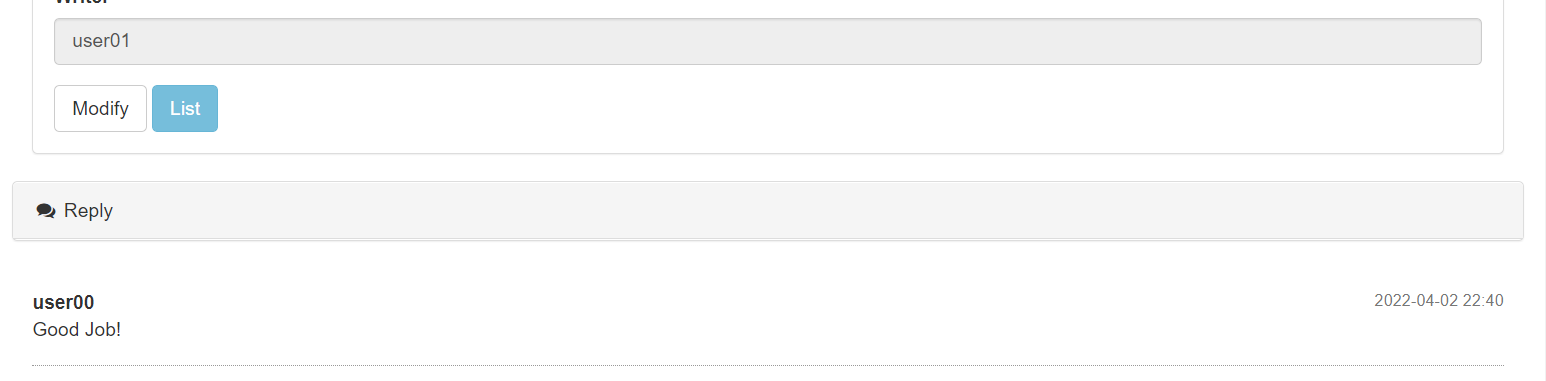
17.5 이벤트 처리와 HTML 처리
이제 화면에서 버튼 등을 통해 발생하는 이벤트를 감지하고, Ajax 호출의 결과를 화면에 반영해보자.
- 조회 페이지가 열리면 댓글을 가져와서 아래쪽에 출력
- 댓글에 대한 처리는 모달창을 이용
17.5.1 댓글 목록 처리
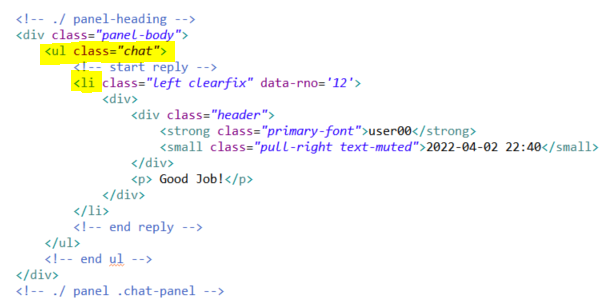
get.jsp 일부
...생략...
					<!-- /.end panel -->
                </div>
                <!-- /.col-lg-12 -->

                <!-- 댓글 목록 -->
	            <div class='row'>
	            	<div class="col-lg-12">

	            		<!-- /. panel -->
	            		<div class="panel panel-default">
	            			<div class="panel-heading">
	            				<i class="fa fa-comments fa-fw"></i> Reply
	            				<button id='addReplyBtn' class='btn btn-primary btn-xs pull-right'> New Reply </button>
	            			</div>
	            		</div>

	            		<!-- ./ panel-heading -->
	            		<div class="panel-body">
	            			<ul class="chat">
	            				<!-- start reply -->
	            				<li class="left clearfix" data-rno='12'>
	            					<div>
		            					<div class="header">
		            						<strong class="primary-font">user00</strong>
		            						<small class="pull-right text-muted">2022-04-02 22:40</small>
		            					</div>
		            					<p> Good Job!</p>
	            					</div>
	            				</li>
	            				<!-- end reply -->
	            			</ul>
	            			<!-- end ul -->
	            		</div>
	            		<!-- ./ panel .chat-panel -->

	            		<div class="panel-footer">

	            		</div>
	            	</div>
	            </div>
	            <!-- ./ end row -->

            </div>
            <!-- /.row -->
<%@include file="../includes/footer.jsp" %>

...생략...
위 코드를 추가하면, 게시글 아래쪽에 댓글의 목록이 보이게 된다.
이벤트 처리
게시글의 조회 페이지가 열리면 자동으로 댓글 목록을 가져와서 <li> 태그를 구성해야 한다. 이에 대한 처리는 $(document).ready() 내에서 이루어 지도록 구현한다.
get.jsp 일부
showList()는 페이지 번호를 파라미터로 받도록 설계하고, 만일 파라미터가 없으면 자동으로 1페이지가 되도록 설정한다.
<script type="text/javascript">
	$(document).ready(function(){

		//console.log("===============================");
		//console.log("============JS TEST============");

		var bnoValue = '<c:out value="${board.bno}"/>';
		var replyUL = $(".chat");

		showList(1);

 		function showList(page) {
			//해당 게시물의 모든 댓글을 가져오는지 확인
			replyService.getList(
					{bno:bnoValue, page: page || 1},
					function(list){
						var str = "";

						if(list==null || list.length ==0) {
							replyUL.html("");
							return;
						}

						for(var i=0, len = list.length||0; i<len; i++){
							str += "<li class='left clearfix' data-rno='" + list[i].rno + "'>";
							str += "<div> <div class='header'> <strong class='primary-font'> " + list[i].replyer + "</strong>";
							str += "<small class='pull-right text-muted'> " + list[i].replyDate + "</small></div>";
							str += "<p>" + list[i].reply + "</p></div></li>";
						}

						replyUL.html(str);
					}
			); //end function
		}	//end showList */


        ...생략...
시간에 대한 처리
위 코드까지 적용 후 실행해 보면 댓글을 잘 나오지만, 시간의 형태가 이상하게 나올 것 이다. XML이나 JSON 형태로 데이터를 받을 때에는 순수하게 숫자로 표현된 시간 값을 가져온다. 따라서, 이를 변환해주는 과정이 필요하다.
reply.js
	function displayTime(timeValue){
		var today = new Date();

		var gap = today.getTime() - timeValue;

		var dateObj = new Date(timeValue);
		var str = "";

			//차이가 24시간 보다 적게 나면 시/분/초 로 표시
			if(gap < (1000 * 60 * 60 * 24)) {
				var hh = dateObj.getHours();
				var mi = dateObj.getMinutes();
				var ss = dateObj.getSeconds();

				return [(hh > 9 ? '' : '0') + hh, ':', (mi > 9 ? '' : '0') + mi, ':', (ss > 9 ? '' : '0') + ss].join('');
			}
			else {
				var yy = dateObj.getFullYear();
				var mm = dateObj.getMonth() + 1; //getMonth는 0부터 시작하기 때문
				var dd = dateObj.getDate();
				return [yy, '/', (mm > 9 ? '' : '0') + mm, '/', (dd > 9 ? '' : '0') + dd].join('');
			}
	};

    	return {
		add:add,
		getList : getList,
		remove : remove,
		modify : modify,
		get : get,
		displayTime : displayTime
	};

})();
get.jsp 일부
...showList(page) 내 수정...

for(var i=0, len = list.length||0; i<len; i++){
	str += "<li class='left clearfix' data-rno='" + list[i].rno + "'>";
	str += "<div> <div class='header'> <strong class='primary-font'> " + list[i].replyer + "</strong>";
	str += "<small class='pull-right text-muted'> " + replyService.displayTime(list[i].replyDate) + "</small></div>";
	str += "<p>" + list[i].reply + "</p></div></li>";
}

...생략...
테스트 수행
17.5.2 새로운 댓글 처리
댓글 목록 상단에 버튼을 하나 추가해서 사용자들이 새로운 댓글을 추가할 수 있도록 한다.
get.jsp 일부
 ...생략...
		<!-- 댓글 목록 -->
	            <div class='row'>
	            	<div class="col-lg-12">

	            		<!-- /. panel -->
	            		<div class="panel panel-default">
	            			<div class="panel-heading">
	            				<i class="fa fa-comments fa-fw"></i> Reply
	            				<button id='addReplyBtn' class='btn btn-primary btn-xs pull-right'> New Reply </button>
	            			</div>
	            		</div>

 ...생략...
테스트 수행

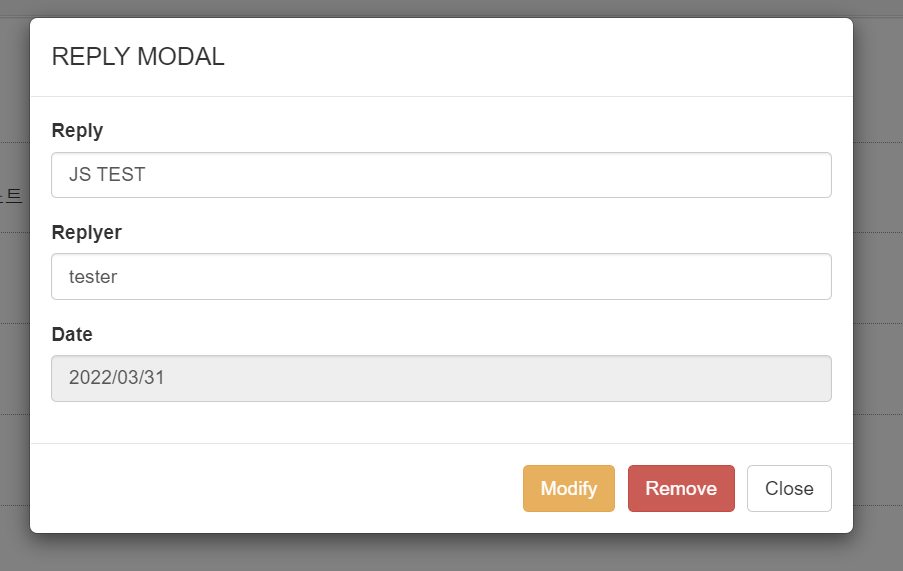
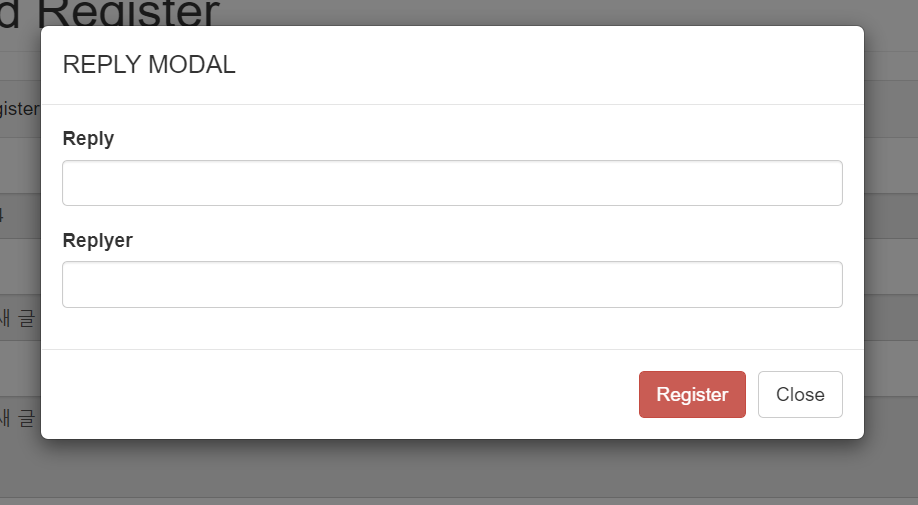
댓글의 추가는 모달창을 이용해서 진행한다. (모달창의 코드는 SBAdmin2의 pages 폴더 내 notifications.html 안에 포함되어 있다.)
get.jsp 내 모달창 코드
<%@include file="../includes/footer.jsp" %>
<!-- 댓글 Modal -->
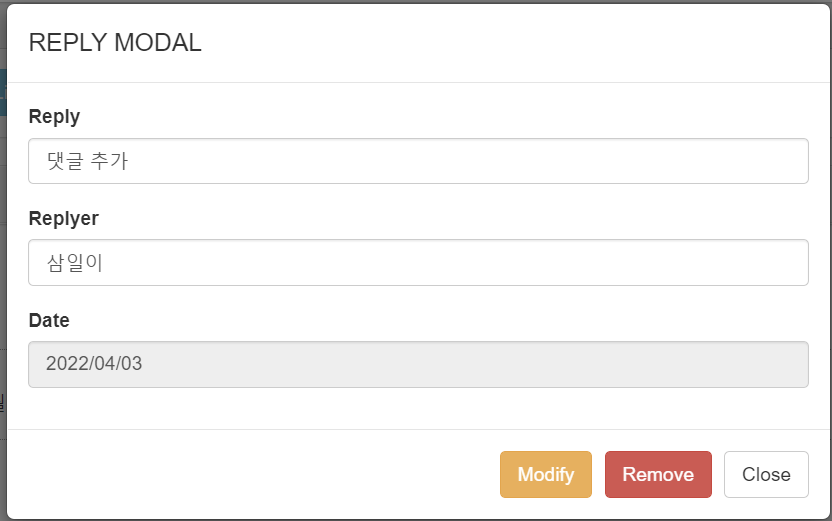
<div class="modal fade" id="myModal" tabindex="-1" role="dialog" aria-labelledby="myModalLabel" aria-hidden="true">
<div class="modal-dialog">
<div class="modal-content">
<div class="modal-header">
<button type="button" class="close" data-dismiss="modal" aria-hidden="true">×</button>
<h4 class="modal-title" id="myModalLabel">REPLY MODAL</h4>
</div>
<div class="modal-body">
<div class="form-group">
<label>Reply</label>
<input class="form-control" name='reply' value='New Reply!!'>
</div>
<div class="form-group">
<label>Replyer</label>
<input class="form-control" name='replyer' value='New Replyer'>
</div>
<div class="form-group">
<label>Date</label>
<input class="form-control" name='replyDate' value=''>
</div>
</div>
<div class="modal-footer">
<button id='modalModBtn' type="button" class="btn btn-warning">Modify</button>
<button id="modalRemoveBtn" type="button" class="btn btn-danger">Remove</button>
<button id="modalRegisterBtn" type="button" class="btn btn-danger">Register</button>
<button id="modalCloseBtn" type="button" class="btn btn-default">Close</button>
</div>
</div>
<!-- /.modal-content -->
</div>
<!-- /.modal-dialog -->
</div>
<!-- /.modal -->
<script type="text/javascript" src="/resources/js/reply.js"> </script>
<script type="text/javascript">새로운 댓글의 추가 버튼 이벤트 처리
댓글 목록 상단의 'New Reply'를 클릭하면 화면에서는 모달찰을 아래와 같이 보이게 처리한다.
<script type="text/javascript">
	$(document).ready(function(){


		var bnoValue = '<c:out value="${board.bno}"/>';
		var replyUL = $(".chat");

		showList(1);

		...생략...

		var modal = $(".modal");	//class로 가져올 때 .
		var modalInputReply = modal.find("input[name='reply']");
		var modalInputReplyer = modal.find("input[name='replyer']");
		var modalInputReplyDate = modal.find("input[name='replyDate']");

		var modalModBtn = $("#modalModBtn");	//id로 가져올 때 #
		var modalRemoveBtn = $("#modalRemoveBtn");
		var modalRegisterBtn = $("#modalRegisterBtn");

		//댓글 입력 버튼 눌렀을 때,
		$("#addReplyBtn").on("click", function(e){
			modal.find("input").val("");
			modalInputReplyDate.closest("div").hide();
			modal.find("button[id != 'modalCloseBtn']").hide();

			modalRegisterBtn.show();

			$(".modal").modal("show")
		});

        ...생략...
사용자가 'New Reply' 버튼을 클릭하면 입력에 필요 없는 항목들을 안 보이게 처리하고 모달창을 보이게 한다.
댓글 등록 및 목록 갱신
새로운 댓글의 추가는 필요한 댓글의 내용(reply)과 댓글의 작성자(replyer) 항목만으로 작성해서 모달창 아래쪽의 'Register' 버튼을 클릭해서 처리한다.
get.jsp 내 새로운 댓글 추가 처리
댓글이 정상적으로 추가되면 경고창을 이용해서 성공했다는 사실을 알려주고, 등록한 내용으로 다시 등록할 수 없도록 입력 항목을 비우고 모달창을 닫는다.
..생략..

 		//새로운 댓글 추가 처리
		modalRegisterBtn.on("click", function(e){
			var reply = {
					reply : modalInputReply.val(),
					replyer : modalInputReplyer.val(),
					bno : bnoValue
			};

			replyService.add(
					reply,
					function(result){
						alert("RESELT : " + result);
						modal.find("input").val("");
						modal.modal("hide");
					}
				);

		});

..생략..
테스트 수행
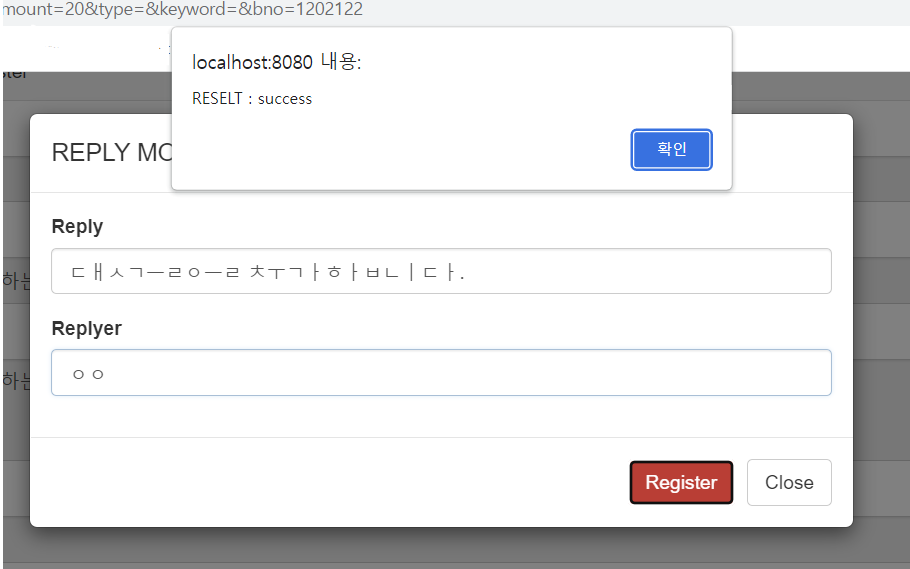
댓글이 정상적으로 처리됐지만 댓글 리스트 자체는 갱신된 적 없으므로 화면에서 새로 등록된 댓글이 보이지 않는다. 이를 해결하기 위해 댓글의 목록을 다시 갱신해야한다.
get.jsp 내 새로운 댓글 추가 처리
: 기존의 코드에서 showList(1)을 추가하여 댓글이 추가된 후 다시 1페이지의 새로운 댓글들을 가져오도록 한다.
 		//새로운 댓글 추가 처리
		modalRegisterBtn.on("click", function(e){
			var reply = {
					reply : modalInputReply.val(),
					replyer : modalInputReplyer.val(),
					bno : bnoValue
			};

			replyService.add(
					reply,
					function(result){
						alert("RESELT : " + result);
						modal.find("input").val("");
						modal.modal("hide");
					}
				);

			showList(1);
		});
17.5.3 특정 댓글의 클릭 이벤트 처리
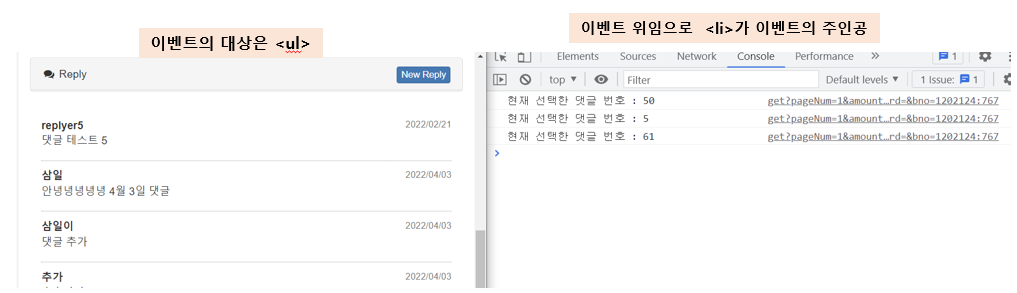
즉, 이미 입력된 댓글의 수정이나, 삭제하는 경우를 처리하는 부분이다. 동적으로 각 댓글마다 Ajax를 통해서 <li> 태그들이 만들어지면 이후에 이벤트를 등록해야 한다. 이는 '이벤트 위임(delegation)'의 형태로 작성해야 한다.
'이벤트 위임'이란? 이벤트를 동적으로 생성되는 요소가 아닌 이미 존재하는 요소에 이벤트를 걸어주고, 나중에 이벤트의 대상을 변경해주는 방식을 말한다. (JQuery는 on()을 이용해서 쉽게 처리할 수 있다.)
get.jsp 댓글 클릭 이벤트 처리
		//댓글마다 이벤트 걸기
		$(".chat").on("click", "li", function(e) {
			var rno = $(this).data("rno");
			console.log("현재 선택한 댓글 번호 : " + rno);

		});
아래와 같이 ul 태그의 클래스 'chat'을 이용해서 이벤트를 걸고, JQuery를 통해 실제 이벤트 대상은 <li> 태그가 되도록 처리하였다.
실행 결과
위와 같이 동작했다면! 이제 댓글을 클릭했을 때, 댓글의 내용/정보를 볼 수 있고 수정/삭제할 수 있는 버튼이 있도록 모달창 처리를 해본다.
get.jsp 댓글 이벤트 처리
		//댓글마다 이벤트 걸기
		$(".chat").on("click", "li", function(e) {
			var rno = $(this).data("rno");
			console.log("현재 선택한 댓글 번호 : " + rno);

			replyService.get(rno,
					function(reply){
						modalInputReply.val(reply.reply);
						modalInputReplyer.val(reply.replyer);
						modalInputReplyDate.val(replyService.displayTime(reply.replyDate)).attr("readonly", "readonly");
						modal.data("rno", reply.rno);

						modal.find("button[id != 'modalCloseBtn']").hide();
						modalModBtn.show();
						modalRemoveBtn.show();

						$(".modal").modal("show");
					}
			);
		});
실행 결과
17.5.4 댓글의 수정/삭제 이벤트 처리
get.jsp 내에서 댓글 수정
		//댓글 수정 처리
		modalModBtn.on("click", function(e){
			var rno : modal.data("rno");

			replyService.modify(
					rno,
					function(result){
						alert("RESELT : " + result);
						modal.modal("hide");
						showList(1);
					}
				);
		});
get.jsp 내에서 댓글 삭제
		//댓글 삭제 처리
		modalRemoveBtn.on("click", function(e){
			var rno = modal.data("rno");

			replyService.remove(
					rno,
					function(result){
						alert("RESELT : " + result);
						modal.modal("hide");
						showList(1);
					}
				);
		});
다음 게시글은 댓글에서의 페이징 처리!